
This is an in-progress blog of the process of solving the fourth in the Myst series. I’m using the Mac for 10.8 and above created by taking the disks and using this installer. Rather than using the camera & viewer, that I find clumsy, I like to take screen shots, then crop them to get the specific detail I’m interested in.
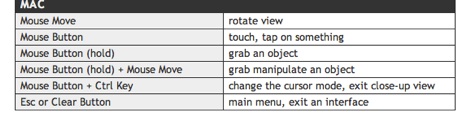
Mouse controls:
If you’ve ever played a Myst game you know this, but be sure to CHECKPOINT (i.e. SAVE) many times along the way, so you can always go back to a previous point if you want to, even if it’s just to check whether you had any alternatives to a decision you made.
Maps & Detail drawings:
Map on Wall in Atreus’ Main Lab
ViewPoint Window in Atreus’ Main Lab
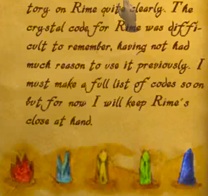
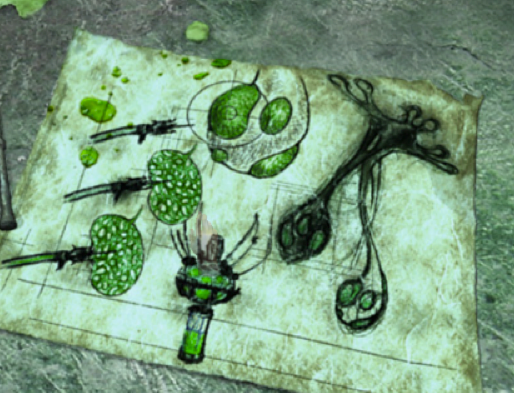
Imager Details from Atreus’ Journal
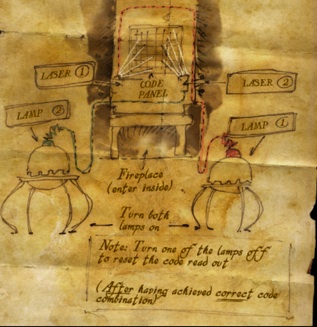
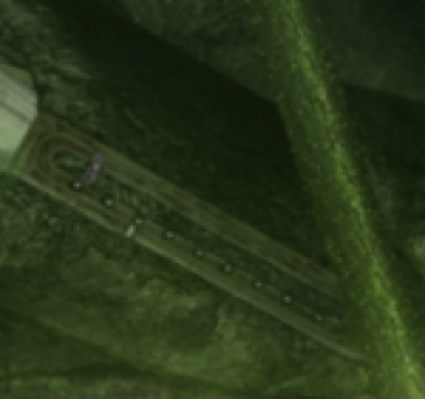
Diagram of Control Room from Atreus’ Journal
Controls:
- Image Viewer — used initially under Atreus’ instruction
- 3 Circle Viewers — initially inactive
- Red button on chair at top of stairs — chair spins but button appears inactive
- Hold & Click between chair and Stairs to Elevator
- Lever (somewhat hidden from view) that opens elevator door
- Elevator Level Control (bottom level will not open initially)
- Crank near stairs at last place can get to initially on Mid-level (inactive initially)
- Pull switch near Crank (inactive initially)
- Switches on “Bed Lamps” in Atreus’ Bedroom
- Fireplace Elevator (inactive initially)
- 3 button panel in Mid-Level Lab (inactive initially; can be turned on by Main Control Device)
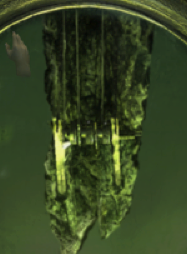
- Leaf Microscope in lab; can be turned to three positions
- Main Control Device lab
- BlueFly Incubator: (can be opened & BlueFlies come out; once open, it stays open)
- Door from lab to outside (initially won’t open)
- Lily door: (will open initially; closes when you walk away from it)
- Viewer device in downstairs lab (turns initially but doesn’t appear to do anything yet)
Code-related
Rime code for Chrystal Viewer (from Atreus’ Journal):
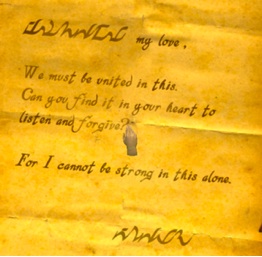
Possible decoder of Language? :
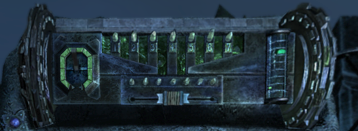
Control Panel (Not Main Control Panel) in Atreus’ Bedroom:
Butterfly Pages
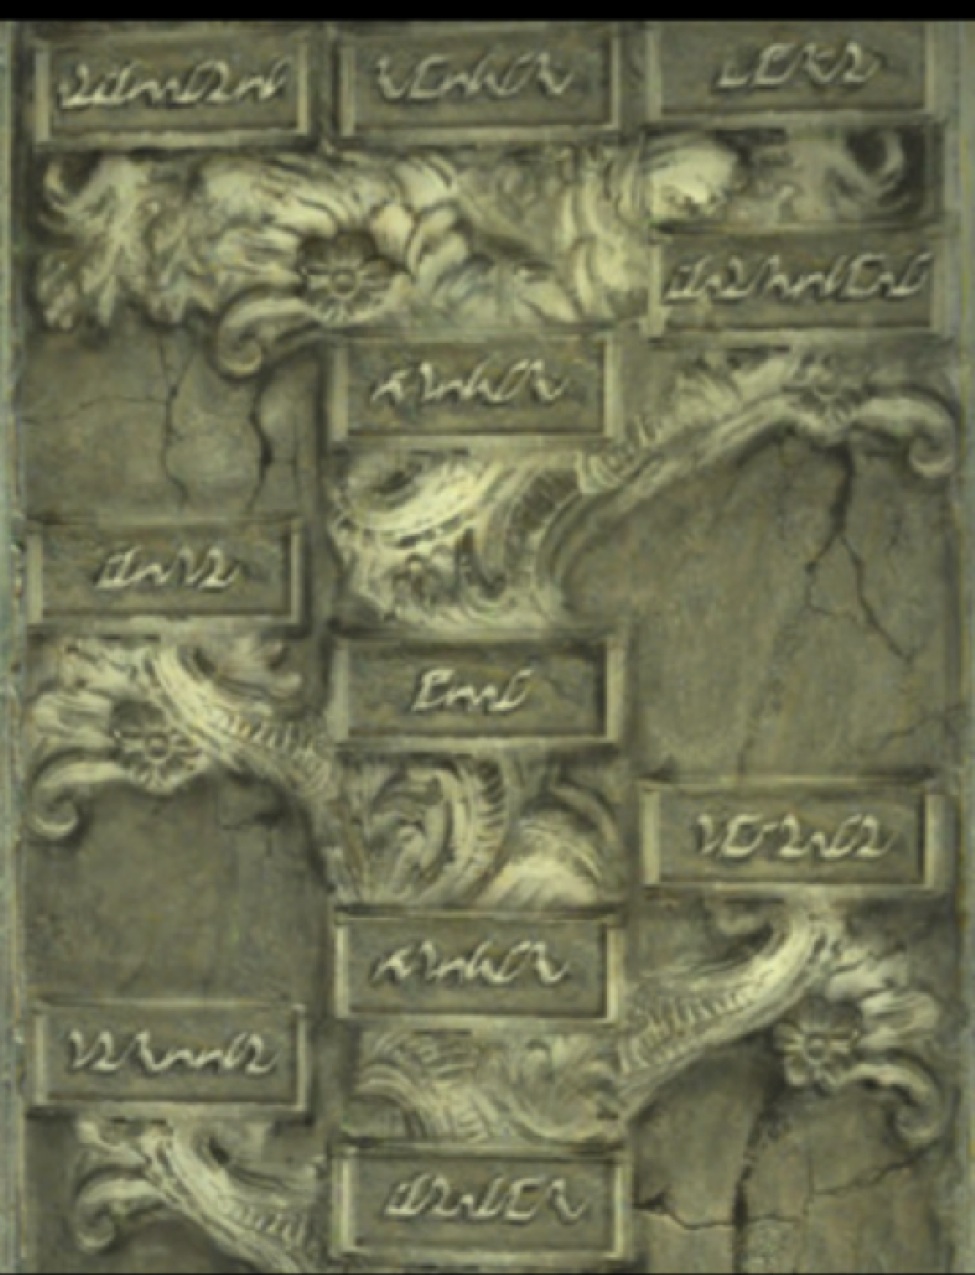
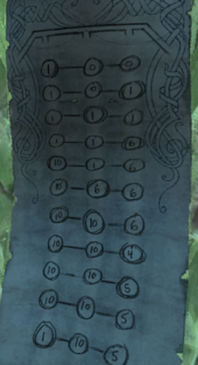
RunePanel Mid-level down ladder: Clue or Detail
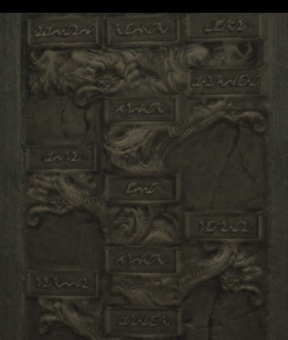
Later LIGHTED:
A clue to a correct rune? (Leaf Microscope) or Control???:
Signals:
Elevator Floor Signal
Track of potential paths:
Middle Floor –> 1st Greenhouse
———> on toward next conservatory (see Yeesha)
—————> meet Yeesha at 2nd Greenhouse (she tells of Necklace Amulet showing her things on “Serenia” which she says Atreus says are NOT real, but “my brothers say they are”
————–> Study to right of path
—————> Left wooden path —> Water controlled Power Plant
–> circle with 2 cranks (presumably to reach other houses; initially not operative)
–> Right wooden path —> Power Room –> If I Pull lever — light goes off and does not come back on, lever inoperative (went back to before I pulled it to see if it affects what Yeesha says)
–> stairway down –> see Yeesha (but only info is again that she’s in contact with brother)
Notes in Progress
- Read Atreus’ diary for first time. (found in drawer in desk nearest to the View Window). Learn that Sirrus is “harnessing electricity” with rude sketch of device.
- Finally figured how to get Elevator to open from MainRoom. Opens on MiddleTier (Bottom Tier currently inaccessible.)
- The BackDoor of the NatureLab can’t be opened initially; must lead to area inaccessible. What enables the control (in this case, the door handle).
- Decide to go back to beginning to see if I can bring Yeesha back (after a quick walkaround here. ) Ok. Yeesha down here. So I won’t go back, though I do imagine I may need to get the Flyer back at some point. (Went back later; though light is on, can’t bring back CableFlyer.
- Thinking of the BlueBugs in the jar as a control. They can be let out. Also considering WhiteLily in openable case as control. It can be opened. If it’s opened before I open the BlueBug cage, will the BlueBugs fly to the Lily? No, it closes as soon as I walk away from it.
- Main Control Panel in lab is clearly central. By playing with it, it can be figured out how to turn many devices on and off. If you’d like info on how the panel works, click here.
Once we get the Main Control Panel to turn back on the Water Power Plant, Yeesha crosses to the furthest hut and we find ourselves under water!
Apparently only way to go. I’m stuck on one side of the Mid-Level and Yeesha on the other. Power is on, but lights are off. Light comes on viewed in Basement Lab but not clear that I’m seeing anything new. Snapping a picture of rune panel. Go back to elevator. Oh, cool, now we can get to BottomLevel…and back to bedroom. On the lookout for Yeesha, figuring she’ll reveal something useful.
Ah, her amulet is in the Fireplace. (It gets automatically saved in the area with the camera, hyperlink, etc.) And a new puzzle appears. (Note: the two lamps must be turned on to see the Fireplace Laser Puzzle. First step will be look at the Control Panel diagram we found in Atreus’ bedroom. It resets to original position once we leave the Fireplace. Checkpointing here. Laser Code Puzzle can be reset by pushing the button. Clearly the goal is to get all the points of light “on” and none of the non-points. Pressing the center button turns of squares to ON, but also turns any that are ON to OFF. I bet “Go” players can whiz through this. No obvious way to make the challenge logical, eliminate dead ends, etc. yet…
…Looks like: starting in upper right, choosing buttons that only turn on the ones I want and working left, I may have got it. Soon see…YES! Success. Must checkpoint here because it’d be a pain to repeat that exercise.
Only one place to go from here…investigate wheel with pelican-like shape in it…pull handle to open pod…enter pod
AHHH! 2 linking books…presumably to the two prison ages!
SPIRE on the left. Off we go…
(I realize now, despite the teaser at the beginning of” do this and that,” we won’t see Atreus again until the very end.)
We’re in a complex but completely isolated place: a cave, perhaps once a barred cell, on the side of the Spire itself. There are things here to look at and there must be something to control and there must be puzzle of how to get it to work.
The hand suggests we can step forward to the edge of the cave or to some plumbing in the back of it. One step forward first. Is this a way to walk out of here? No, we get a better view of what must have been an unimaginably bleak cell. Geez, Atreus sure wasn’t easy on his son!
Ah, we DO have a path to follow down from the Aerie as I’ll call it from now on.
But I want to check out the plumbing stuff first.
The Iron Chair in the Aerie seems to be detail rather than clue.
But the Ottoman Pedestal reveals a Book! A linking book???
Probably, but not activatable yet.
The Fluid Valve can go up (using the hand) but the hand can’t turn it, and it slides back down when we let go.
Ah, on the velvet couch near the door, another book…inactive. Ah, the amulet lights and we get memories. Talking to Yeesha. So far these seem to be simply story elements irrelevant to solving the puzzles. We’ll keep watching them, though, as Yeesha has previously given us useful info.)
if we look back at the torn bars after we step out, we can see the prison this brother (apparently Sirius) escaped from.
Two paths at the bottom of the stairs. Checkpoint and return later.
Left path brings us to another memory. A spire that we can’t seem to manipulate.
Right path brings to an elevator by pressing the blue button. We can move the lever but not get it to work.
Starting over to track paths in Spire:
Jail Cell —> inside (manipulable food bin; plumbing knob liftable but not turnable or able to kept in up position; book, possibly linking book, not openable) definitely will need to return here) —> outer cell (book brings amulet to hearing Yeesha tell Sirius that she will teach him “dunning”—> step out of cave (amulet shows cell intact and sounds of break-out) —> 4 steps to first option:
> LEFT –> Elevator shaft & Blue Button (clicks but no effect yet)
> RIGHT –> Down three more steps to plateau
> LEFT (through space in wall) –> across bridge to Crystal spire (amulet reveals that crystal can glow) (large slider cannot be moved to equal mark on its left side)
>TUNNEL DOWN on right side of bridge –> Amulet reveals that Sirius hopes to find linking book at bottom (looks like there might not be an easy way back out — rope is broken — so checking RIGHT path before going down hole)
> Center –> sculpture identical to picture in Atreus’ bedroom, amulet reveals question of who is holding boat
> RIGHT –> Amulet reveals Sirius trying to figure his way out of dilemma –> back one step to access rock bridge –> Blue button (takes a couple seconds) brings up elevator (but switch inside is currently inoperative; clicking blue button again does not send it back down so down Tunnel q seems only alternative to progress)
Picking up from End of Tunnel (cannot go back up Tunnel)
>LEFT —> Amulet reveals Sirius trying to launch “another ship” –> turning box ON with control at left, bottom, and moving slider back and forth somewhat aimlessly led to Ship Lowering (CHECKPOINTED here)
>Straight & down –>
Ok here’s the puzzle:
We have a control with three positions: left, center, & right.
The on/off switch appears to be a reset button.
The ball on the right seems to be in the sixth of eight slots.
Experimenting: Left, one light on far left goes on; center, still none, right, 4 lights at bottom light. Playing around with it, haven’t detected the pattern yet, but don’t know what my goal is either. Obviously connected to the PrintedCircuit Panel. Get all 7 lit? Probably not that simple…
There’s a second similar device up the ladder tower accessible here. It has only 4 lights. I decided that what I was trying to do was to get the ball in the middle, since Sirius talks of necessity of balance. This has opened a stepping stone of floating rocks that I can now follow. We’ll see where this leads…
…to a blue button and another apparent elevator…brings us down a level…with a (locked) cell door w/ an electric wire and a chair in it; stairway up…note on ground:
Take elevator up and we’re on more floating rocks, higher up.
Adding full set of my notes on Spire (June 15, 2013):
A review of my notes from that start point reveals a great many manipulable objects that had no part at all in my getting to the linking books to the prison age, Spire, where Sirrus is trapped and now I’m following his path as best I can. Does this mean that there will be areas of Spire that will never be important to the solution of spire? This is not in keeping with anything I’ve encountered in previous Myst games. Nearly everything one finds in those games matters.
I’m also wondering what would have happened if I’d gone to the prison island where Achenar is trapped. I’ve always assumed somehow I must solve both ages. Still assume that as soon as you finish one, you have to tackle the other.
Spire isn’t nearly as confusing spatially as say, the plant age in Riven III Exile. Yet it presents a series of essentially numeric puzzles that are extremely baffling along with a whole array of things that so far I have no idea how they’re related to the solution of the puzzle.
Controllable objects on Spire:
- A tube at the entrance cell that can be pushed up to ceiling, but slides back down again.
- A linking book that can be reached, but not opened (note: discovered similar one on Achenar’s prison island, but that one can be opened and can return back to Starting Place
Rest of my notes on Spire:
Tracking from start of Spire:
Jail Cell —> inside (manipulable food bin; plumbing knob liftable but not turnable or able to kept in up position; book, possibly linking book, not openable) definitely will need to return here) —> outer cell (book brings amulet to hearing Yeesha tell Sirius that she will teach him “dunning”—> step out of cave (amulet shows cell intact and sounds of break-out) —> 4 steps to first option:
> LEFT –> Elevator shaft & Blue Button (clicks but no effect yet)
> RIGHT –> Down three more steps to plateau
> LEFT (through space in wall) –> across bridge to Crystal spire (amulet reveals that crystal can glow) (large slider cannot be moved to equal mark on its left side)
>TUNNEL DOWN on right side of bridge –> Amulet reveals that Sirius hopes to find linking book at bottom (looks like there might not be an easy way back out — rope is broken — so checking RIGHT path before going down hole)
> Center –> sculpture identical to picture in Atreus’ bedroom, amulet reveals question of who is holding boat
> RIGHT –> Amulet reveals Sirius trying to figure his way out of dilemma –> back one step to access rock bridge –> Blue button (takes a couple seconds) brings up elevator (but switch inside is currently inoperative; clicking blue button again does not send it back down so down Tunnel q seems only alternative to progress)
Picking up from End of Tunnel (cannot go back up Tunnel)
>LEFT —> Amulet reveals Sirius trying to launch “another ship” –> open coffer reveals a Control Panel –> when I somehow get 5 lit across the top (by turning on the thing on the left & sliding the slider back and forth a few times) the “Ship” comes down like Groucho’s duck. When I then go back to Printed Circuit Board, five units are lit on the left side of the board. Any attempt to touch the board repels the hand and doesn’t affect the board.
>Straight & down –>
Ok here’s a puzzle:
We have a control with three positions: left, center, & right.
The on/off switch appears to be a reset button.
The ball on the right seems to be in the sixth of eight slots.
Experimenting: Left, one light on far left goes on; center, still none, right, 4 lights at bottom light. Playing around with it, haven’t detected the pattern yet, but don’t know what my goal is either. Obviously connected to the PrintedCircuit Panel. Get all 7 lit? Probably not that simple.
There’s a second similar device up the ladder tower accessible here. It has only 4 lights. I decided that what I was trying to do was to get the ball in the middle, since Sirius talks of necessity of balance. This has opened a stepping stone of floating rocks that I can now follow. We’ll see where this leads…
…to a blue button and another apparent elevator…brings us down a level
Take elevator up and we’re back to floating rocks
At bottom of shaft reached by Elevator at end of Floating rocks, find VAULT with THRONE CHAIR. Obviously must UNLOCK this VAULT or Jail. But perhaps not, this may release Sirius. Remember that we don’t know where he is. Presumably, he’s somewhere on the island of Spire.
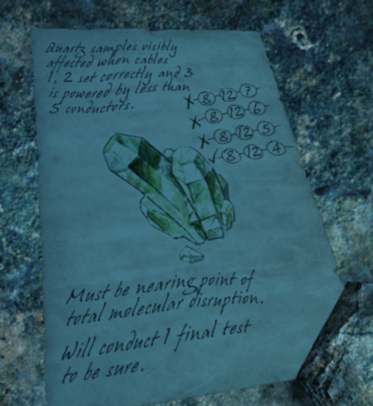
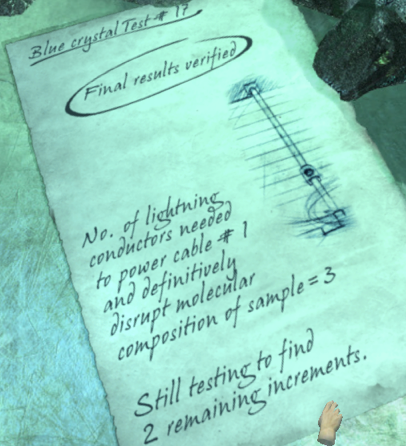
“Quarts samples visibly affected when…”: The whole island is made of quartz, so solving this problem, using this coded message, will change everything dramatically. This appears to be the mega problem, with three sub-problems:
“1 and 2 set correctly and 3 is powered by less than 5…” Unclear which controls this refers to.
Two power cables go into locked chamber and emerge at floating rocks. Red and Blue. One goes up, other on this level or down one.
Ah, a new space: chessboard, a control-looking object, a whole I can look into and go down. Let’s look around first.
Near new control object (holds quartz, uncertain yet whether it is control or something else) is more clue stuff;

More info metal box near note about cable combo:
The hidden page is almost reachable. Tease or crucial?
Other note on table:
Round tray with Quartz in it CAN be turned, but returns to its original position:
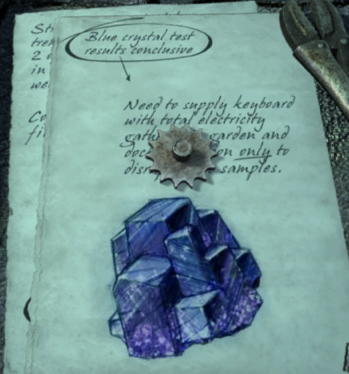
Blue Crystal Test #17
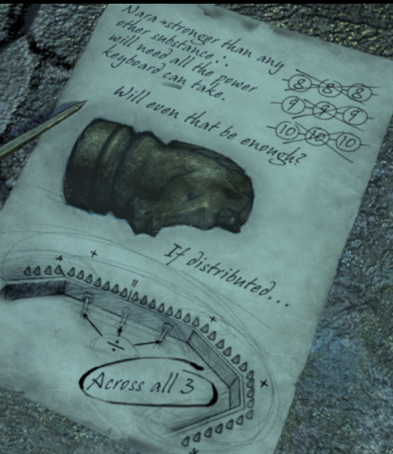
Chessboard: Clue or detail? Appears to be detail. Amulet gives info that played w/ his father and go some Nara crystals. So presumably white pieces are made of Nara, substance mentioned in one of notes.
Completing the clockwise exploration, between chessboard and Lazy Susan of Quartz crystals, is shining quartz w/ Amulet message. Shows slider at bottom position. Refers to this as Rock Test #29.
Going back counter-clockwise toward chessboard, we can get a closeup of a broken piece of slider:
Now down the hole: Leads to inside of Throne Chair room.
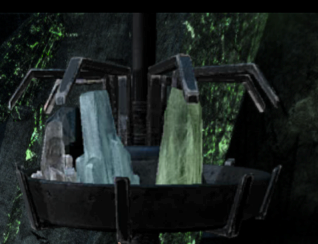
All three cables are here: RED, BLUE, and YELLOW
Code note in Throne Room:
First notch of blue button on left top brings us one level down. At this point, I just get some more story here.
Back up to the Throne Room, I find that the Central Switch can be lifted. This appears to power off the throne chair blue slider; unclear why I want this power off, but sometimes off seems to work in this game.
From inside I can open gate. Once open, appears to stay open.
Now on main floor again. Find & read Sirius’ Diary. I see his goal, and presumably mine, is to get the “ship” tied to a rock and float across the gap to what Sirius calls the “palace” and then somehow get from there to the bottom of spire/island. But the problem to solve is still to get the lights on the controls lit correctly.
From gap in quartz, can go Up / Down.
UP pole: Here’s the 4-Geode Control Box. Currently it is on with 3 lights lit and the ball in the middle. The BLUE cable leads here.
From the same quartz passageway, I can open a vault-like door and go DOWN to the other Control Machines.
The big Printed Circuit (PC) Board thing is here, now with the top 3 lights lit, like the 4-Geode Control box. I recall that the middle row of lights was controlled by the 7-Geode Control Box (CB) (currently 5 lights on). The PC Board’s own controls still crackle when touched and don’t work. The 7-Geode CB is also on this level (and does currently have 5 lights lit, the ball in the middle spot and sparks crossing. I wonder whether the 4-Geode CB is really set right. I can’t tell which color the cable is.
At the view point I can see the Floating Geodes and hear Sirius speak (through the Amulet) of succeeding in get his “ship” to float in the air.
I came down the pole-stair to get here, but there’s a metal rungs gangplank or stair off to the right of it. From here it looks like the cable is RED in this area. There’s a large stone/mechanical/chain object that it doesn’t look like I have any way to affect directly. At the end of the gangplank is a Crystal Tube. Most likely this is how I got here in the first place. It’s down only, meaning I can’t enter it from here. There’s what looks to be a brightly lit quartz cave entrance behind the PC Board, but I don’t seem to be able to go there.
Back on what I’m calling the Main Level, where Sirius has his book and garden, I find again the Crystal Tube that leads to the Throne Room. Can’t immediately get back to Main Level. Climb stairs and call elevator with blue button.
| Control | Details | Current Status | What do they do? |
| Throne Room Master Switch | Open / Closed | Open | Makes Throne Chair inactive when open; But originally was closed so must be significant |
| Blue button on Throne Chair | Toggle | lowers/raises chair & Control Module | |
| Control Module | |||
| Blue knob | Slider to multiple positions; With Master Switch off, does not move; can move one position with Master on, 2 red lights seem to limit where it can be set; with Power ON and geodes at 4 and 7, I can move this down another level. | 3 levels accessible | |
| 2 Big stone metal buttons at front of console | Look like push buttons; inactive so far | inactive | |
| Rheostat-line knobs on right | Can they move?; 2 were on when Master as on, now neither | inactive | |
| Slider in 2 geode model on Sirius’ work desk | Left or right+ knob can be turned | by spinning knob, and throwing shuttle, can get quartz rock to fall; experiment only? | |
| 4-Geode w/ Slider control | |||
| 7-Geode w/ slider control | |||
| Geode Lazy Susan | turns but won’t hold position | inactive | detail, not control? |
Well, it looks like having all 7 and all 4 lit and power switch in Throne Room on puts power on in the Thrown chair Control Panel. At least we can now move the dials up and down. Is this what is meant by having the power right in the first two cables?
Deeper inspection of the Throne Chair Control suggests that we need more banks of lights to be lit. Could it be that the puzzle is to get all the lights lit?
Yes. I bet so. Back to playing with it. Start with the 4 Geode Control in the Upper Lab. Before going up, collect this. Clue or detail?
4-Geode ctrl = Blue cable
RIGHT
| MOVE | SHUTTLE | FLOATINGLIGHTS | Lights on Master Switch | Bottom | Top | Ball |
| START | CENTER | ALL ON | – | 0 | 0 | 1 |
| R | R | ALL ON | 2 | – | – | – |
| L (no choice) | CENTER | ALL ON | 4 | 2 | 0 | 1 |
| R | returns to CENTER | off-ON-ON-ON | 0 | 0 | 1 | 1 |
| R | R | off-ON-ON-ON | 2 | 0 | 1 | 1 |
| L (no choice) | CENTER | off-ON-ON-ON | 4 | 2 | 1 | 1 |
| R | returns to CENTER | off-ON-ON-ON | 0 | 0 | 1 | 1 |
| R | R | off-ON-ON-ON | 2 | 0 | 1 | 1 |
| L (no choice) | CENTER | 2 | 1 | 1 | ||
| R | returns to CENTER | 0 | 1 | 1 | ||
| R | R | – | – | – | ||
| L (no choice) | CENTER | 2 | 1 | 1 | ||
| R | returns to CENTER | 0 | 1 | 1 | ||
| R | R | – | – | – | ||
| L (no choice) | CENTER | 2 | 1 | 1 |
LEFT
| MOVE | SHUTTLE | FLOATING LIGHTS | Links of master | Bottom | Top | Ball |
| START | CENTER | ALL ON | 0 | 0 | 0 | 1 |
| L | L | ALL ON | 2 | 1 | 0 | 1 |
| R (no choice) | CENTER | ALL ON | 4 | 3 | 0 | 1 |
| L | returns to CENTER | ALL off | fills, moves ball up, returns to 0 | 0 | 4 | 4 |
| L | L | ALL off | 2 | 1 | 4 | 4 |
| R (no choice) | CENTER | ALL off | 4 | 3 | 4 | 4 |
| L | returns to CENTER | ALL off | fills, then returns to 0 | 0 | 4 | 4 |
| L | L | ALL off | 1 | 4 | 4 | |
| R (no choice) | CENTER | ALL off | 3 | 4 | 4 | |
| L | returns to CENTER | ALL off | fills, then returns to 0 | 0 | 4 | 4 |
RIGHT, then LEFT, alternating when there’s a choice
| MOVE | SHUTTLE | FLOATING LIGHTS | Lights on Master Switch | Bottom | Top | Ball |
| START | CENTER | ALL ON | 0 | 0 | 0 | 1 |
| R | R | ALL ON | 2 | 0 | 0 | 1 |
| L (no choice) | CENTER | ALL ON | 4 | 2 | 0 | 1 |
| L | returns toCENTER | off-off-off-ON | fills, then moves ball,then 0 | 0 | 3 | 2+ |
| R | R | off-off-off-ON | 2 | 0 | 3 | 2+ |
| L (no choice) | CENTER | off-off-off-ON | 4 | 2 | 3 | 2+ |
| L | returns toCENTER | off-off-off-ON | 0 | 0 | 3 | 2+ |
| R | R | off-off-off-ON | 2 | 0 | 3 | 2+ |
| L | CENTER | off-off-off-ON | 4 | 2 | 3 | 2+ |
By some sequence of random rights and lefts, I reached this point:
| MOVE | SHUTTLE | FLOATINGLIGHTS | Lights on Master Switch | Bottom | Top | Ball |
| ? | CENTER | off-off-off-ON | 4 | 3 | 3 | 2 |
Ok, big discovery: two machines are linked. I can see the ball changes position, maybe the overhead lights. A brief random exploration….
By futzing with it until I get the ball the 2, where the arrow is, I can now enter the floating ball from the upper control room. All 7 lights of the top row are on, all off the bottom row off and all floating lights in the sky are off.
After much futzing with dials, the big spire doesn’t appear that this has changed since early in the game, so doesn’t appear to interact directly with the 4 & 7 geode control boxes.
And there’s what I can see through the viewer on the island accessible when the ball is at its arrow (2).
The mark point appears to be one step higher than it is on the Crystal Spire. Hmmm.
(Note: Slide to Throne room is accessed on Main Level from Sirrus’ sleeping quarters.)
There’s this, meaningless at the moment:

and this:
The way to the Crystal Shard holding the Giant Slider is up the Elevator at the far end of the Floating Rocks high atop the the peak.
On the way out across the bridge approaching the Crystal Shard, there is a Slider down to ________.
The Slider itself appears to me to always be on the top slot, but the light on the left of it seems to be a notch or two lower. No, it seems to always be on 6.
Ah, here we go:
Each move adds 2 to 10 geodes around On-Off Switch. At 10, moves all in lower panel to upper. So, from an initial fill point, some set of 5 moves has to end up at 34, not more, not less. If the total exceeds 34, it starts over as though first move after turning on switch.
2 -> 3 +10
3 -> 2 -3
Repetitions lead to a total of 24 going to top.
2 -> 1 +7
1 -> 2 -3
Repetitions lead to total of 15 going to top.
Repetitions of 3 / 4 needs to start from a 2 -> 3 move
2 -> 3 + 10 B: 10 MS 2
3 -> 4 + 2 B: 12 MS: 4
4 -> 3 + 10 B:22 MS: 6
3 -> 4 + 2 B:24 MS: 8
4 -> 3 +10 BINGO: 34 All lit
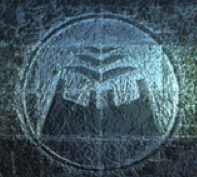
Emblems on Geode Boxes:
7-Geode Box:
4-Geode Box:
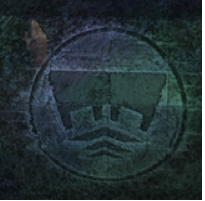
- Symbol on 4-DIodel Box
4-Geode Box moves:
Off: MS: 0 B: 0 T: 0 Ball: 0
C -> L +1 MS: 2 B: 1 T: 0 Ball: 1
L -> C +2 MS: 4 B: 3 T:0 Ball: 1
C -> L +1 MS: 6 / FULL -> 0 B: 4 -> 0 B: 4 Ball: 4
Uh oh. Control Box looks like it needs 35 not 34. Must return to Island. No 34 still seems right.
Turning off 4-G box does NOT lower ball
got back to Ball at 0
C -> R : NC MS:2 B:0 T:0 Ball 1
R -> C: +2 MS:4 B:2 T:0 Ball 1
doesn’t work the same as the one on the Island, need to investigate
7-Geode
Each move increments Switch diodes 1; Fills at 5
C -> L +1 TOTAL: 1
L -> C (no choice) -1 TOTAL: 0
C -> R +4 TOTAL: 4
R -> C (no choice) -2 TOTAL 2
RESULT: L –> 3 R –> 6
C -> R +4 = 4
R -> C -2 = 2
C -> R +4 = 6
R -> C -2 = 4
C -> R +4 = MAX (would be 8 but gives 7 because max.
When diodes fill, # lit on bottom goes to top; ball moves up to 6 or down to 2
4-Geode 3 moves fills diodes
C -> R NC (really -1 if not at 0 already)
R -> C +2
L -> C +1
When filled ball moved from 2 to 5
repeating these three moves has same effect on bottom & top; ball stays at 5
moving R and then C then R again lights 1 Top Geode and raise ball 1 notch.
- Repeating steps leads to same result; not incremental
- Ball remains where it was when move from one control to other
- Sequence always starts w/ CENTER, Main = ON, 0 lights; Bottom = 0
- Number of geodes lit is NOT dependent on status of other box
4-Geode Box: Appears that this box adds to whatever ball is set at by 7-G box
R – L – R Top = 1; Ball = +1
L – R – L Top = 4; Ball = +4
L – R – R Top = 2; Ball = +2
R – L – L Top = 3; Ball = +3
Individual increments:
C -> L +1
L -> C -1
C -> R +4
R -> C -2
See above for way to get all lit on 7-Geode and thus get to Island with 4-G @ 2
7-Geode:
Start: 4G ?; Ball @ 5
L – !R – L – !R – L: Top = 1 Ball = 9 (Top)
L – !R – L – !R – R: Top = 4 Ball = 8
L – !R – R – !L – L: Top = 3 Ball = 8
L – !R – R – !L – R: Top = 6 Ball = 5
R – !L – R – !L – R: Top = 7 Ball = 4
R – !L – R – !L – L: Top = 5 Ball = 6
R – !L – L – !R – R: Top = 5 Ball = 6
R – !L – L – !R – L: Top = 2 Ball = 9
OFF Ball = 9
Start: 4G OFF, Ball @ 7
L – R – L – R – L Top = 1 Ball = -1 to 6
R – L – L – R – L Top = 2 Ball = -1 to 5 (i.e. -2 from where started)
OFF, Ball returns to 7
R – L – L – R – L Top = 2 Ball = -2 to 5
Hypothesis: With 4G (Upper magnet) off, # of lights on in 7G (Lower magnet) = moves ball down that many.
This appears to be correct. Ok. But what is my goal???
OK, finally got somewhere: At FULL power to Throne Chair, blows circuit breaker. So now know what that switch is for. Obviously I’m over some limit. I have Island @ max,
ALL LIGHTS come up on Throne Chair but Fuse Blows:
7G (Blue) is = 3
4G (RED) is OFF
Ball = 4
yet this somehow results in the Throne Chair blowing its fuse!
Went back and re-read note that says total lights in the Throne Chair perimeter panel must be 20. So that is why filling them all blew the fuse. But I’m very surprised that this happened when the 4-G was off entirely. I would have thought less light would be on.
Trying to figure relation between 4-G, 7-G, & TC
4-G Off, 7-G 3, TC: Lights over limit, fuse blows
4-G Off, 7-G OFF: All but 2 light
Remember that box #3 is ON & completely lit on the Island
Is this what has to be 20, exactly? Lots of ways 20 could be achieved.
But first, have to figure out relation of 4-G, 7-G to control panel. Does 4-G decrease flow per # of lights while 7-G increases per # of lights?
Trying 7-G ON & one lit
Leaves it at one less than maximum. Hmmm.
What’s going on? I’ll try 7-G = 5 (4-G is still OFF)
Huh? In current state saved as: _____inoperatv
can access cable bubble-car, but it will not move
Interesting. More and more I am confused by this puzzle.
Went back: Bubble Car operative with 7-G = 7 & 4-G = 2 (Ball = 2) –> CAR = ON
7-G = 5, 4-G ON/0 lit –> ball = 2, but CAR = OFF
7-G = 7, 4-G = 2 –> ball = 2, CAR = ON
If I go to Island and turn 34-G up Full to 34, and come back, blows circuit.
Next: try 6 as note says.
___
Repetitions lead to a total of 24 going to top.
Latest assumption: FILL Throne Chair as first step. Assume first two are correct with all 7 lit & 2 of 4 lit, so that ball is at 2 making Island accessible. At this point, I’m 3 short of filling the Chair. Going back to Island to see where I left it.
I’m at 24 now, so presumably needs to be 27.
Series of 5 moves starting at position 2
1 -> 2 -3
2 -> 1 +7
2 -> 3 +10
3 -> 2 -3
3 -> 4 +2
4 -> 3 +10
Left first
2 -> 1 7
No choice (Right)
1-> 2 -3 4
Right
2-> 3 +10 14
Right
3 -> 4 +2 16
No choice (Left)
4 -> 3 +10 26
So, yes, that lights all but one. So need to get total to 27.
(Turns out I can leave it @ 26 and bump up 4-G from 2 to 3)
Ah, SUCCESS at last!
Now I can get to the next level down with the Throne Chair, but seem to be in a very confined space with no obvious way back to where I was.
Enough for now.
What happens if I reduce 7-G to zero?
Levels:
- Above the clouds
- Main floor w/ Gardens, Sirius’ Workbench/Lab and Sirius’ Bedroom with slide to Throne Room
- Throne Room
- (via Throne Chair) One story down from Throne Room: The pearly couple icon.
The fascination of these type games: Clue versus detail. Isn’t that a big part of what learning how to live is about: Sorting out what’s critical from what’s trivial?
The game itself is, of course, in the trivial category. That is part of its appeal, of its value. That it ultimately matters to no one and only foolishly matters even to you. You know it does not matter, in any serious sense of the word, whether I progress in a game. The solution is trivial. A short internet search would yield all the answers in a few minutes. That’s the beauty part. It don’t matter. It just don’t…unlike so many things in our lives, where it really does matter and there’s no way around it mattering.
I find it difficult to believe that people so massively into shoot-em-ups (first-person shooters or whatever the acronym is this week) but that all but a tiny few aren’t more than mildly aware that this who other type of game, this game of the mind, is so easily at hand.
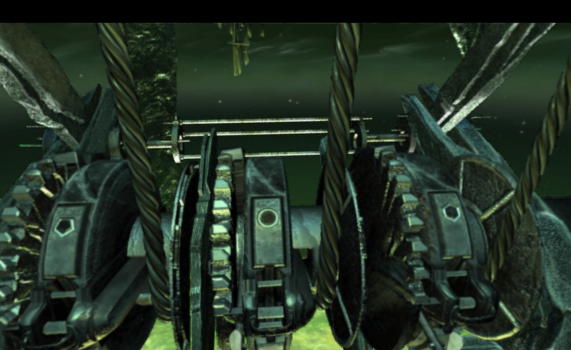
Pentagon — Circle — Hexagon
presumably they can be lit.
Gears can be ratcheted up ? times (7 ? 10?) Seems to be 0 to 8 (i.e. 9 positions)
They do stay in the position you leave them in if you go back up a level
Meanwhile, setting the Throne Chair control panel to 8-12-4 doesn’t seem to do the trick. Is this because more diodes are on than I’m using to get down one level? Seems unlikely. Ah, looked back, says it does have to have 20 units (i.e. 8 + 12 + 4) to work “no more, no less.”
Current: 7 Geode = 7; 4 Geode = 3; Ball @ 2 (Island accessible ???) No, apparently not, not sure why.
Anyway, tried setting G-7 to 0. But 4 more lights than I expected were on in the Throne seat. Have to re-think about the numbers.
3 – 7 – 7 – 6 – 6 – 5 = 34???
I’m so confused. Going back…
All lit: 4 – 7 – 7 – 6 – 6 – 4 = 34
7-G = 7
4-G = 3
If turn off 4-G: -3, so appears to be one to one
Turning off 7-G: reduces it by 6??? confusing. I’ll try 4-G on and 7-G off: still looks like it reduces by 6
So going back to Island with hope of setting it at 20 and then seeing what I get. (Highlighted what has to be lit on 4-G and 7-G).
Full power to board without blowing circuit breaker is
Island board: 26
7-G: 7
4-G: 3
Trying to get this board to 20? Not sure. Will hold here to consider. Saved as 5-25 “Back to Island” (To do this, 7-G = 7 & 4-G = 2)
Curious, with board on island OFF, what do we see? 9, i.e. same as number lit on the other two. So 11 on the island board would work, but also a number that we could adjust the other to get total of 20. Let’s see what’s possible.
Possibilities w/ Island Control Panel:
(Always starts at position #2)
2 -> 1 +7 7
1 -> 2 (No Choice) -3 4
2 -> 1 +7 11
1 -> 2 (No Choice) -3 8
2 -> 1 +7 15
set 7-G to 2
now setting 4-G to 3
uh oh. Need 24 to match the 8 – 12 – 4 configuration, but other note says 20, no more, no less. Ugh.